编译Android系统及驱动

1 引言

简单记录了这三天来编译Android系统内核、驱动走过的路。遇到了很多坑和不懂的东西,为了下次少走些弯路所以简单总结下。横跨很多天的工作不免记忆模糊,如果参考本博客时遇到问题欢迎大家下方留言和指正。

2 环境

  • 宿主机:Windows 11
  • 虚拟机:Ubuntu 18 LTS
  • 16G或32G的内存
  • 1T以上的硬盘空间(推荐使用固态硬盘)

3 准备工作

Android官方文档中推荐使用Ubuntu或者Mac OS系统,这里我们选择了在Windows上使用虚拟机软件(Vmware)运行Ubuntu 18来进行编译。由于Android系统比较庞大,建议大家为虚拟机分配600G及以上的硬盘空间。

3.1 安装工具

首先前往https://source.android.com/source/initializing?hl=zh-cn在Ubuntu中安装必要的软件包。

随后就是安装repo工具,这里我们选择了国内TUNA的镜像,https://mirrors.tuna.tsinghua.edu.cn/help/AOSP/。按照其中的步骤,首先安装git-repo工具;下载TUNA提供的使用每月更新的初始化包,将其解压到虚拟机中并用repo sync进行同步。

3.2 下载Android源代码并选择分支

在(https://source.android.com/docs/setup/about/build-numbers?hl=zh-cn#source-code-tags-and-builds)[https://source.android.com/docs/setup/about/build-numbers?hl=zh-cn#source-code-tags-and-builds]可以查看所有分支,这里我们选择了Android 13的分支,大家可以根据自己情况进行选择。

4 编译Android源代码

4.1 配置编译选项

首先进入aosp目录,运行:

1
source build/envsetup.sh

查看lunch提供的选项(部分):

1
2
3
4
5
6
7
8
9
10
11
12
13
14
15
16
17
18
19
20
21
22
23
24
25
26
27
28
29
30
31
32
33
34
35
36
37
38
39
40
41
42
43
44
45
46
47
48
49
50
51
52
53
54
55
56
57
58
59
60
61
62
63
64
65
66
67
68
69
70
71
72
73
74
75
76
77
78
79
80
81
82
83
$ lunch

You're building on Linux

Lunch menu .. Here are the common combinations:
1. aosp_arm-eng
2. aosp_arm64-eng
3. aosp_barbet-userdebug
4. aosp_bluejay-userdebug
5. aosp_bluejay_car-userdebug
6. aosp_bramble-userdebug
7. aosp_bramble_car-userdebug
8. aosp_car_arm-userdebug
9. aosp_car_arm64-userdebug
10. aosp_car_x86-userdebug
11. aosp_car_x86_64-userdebug
12. aosp_cf_arm64_auto-userdebug
13. aosp_cf_arm64_phone-userdebug
14. aosp_cf_x86_64_foldable-userdebug
15. aosp_cf_x86_64_pc-userdebug
16. aosp_cf_x86_64_phone-userdebug
17. aosp_cf_x86_64_tv-userdebug
18. aosp_cf_x86_auto-userdebug
19. aosp_cf_x86_phone-userdebug
20. aosp_cf_x86_tv-userdebug
21. aosp_cheetah-userdebug
22. aosp_cloudripper-userdebug
23. aosp_coral-userdebug
24. aosp_coral_car-userdebug
25. aosp_flame-userdebug
26. aosp_flame_car-userdebug
27. aosp_oriole-userdebug
28. aosp_oriole_car-userdebug
29. aosp_panther-userdebug
30. aosp_raven-userdebug
31. aosp_raven_car-userdebug
32. aosp_ravenclaw-userdebug
33. aosp_redfin-userdebug
34. aosp_redfin_car-userdebug
35. aosp_redfin_vf-userdebug
36. aosp_slider-userdebug
37. aosp_sunfish-userdebug
38. aosp_sunfish_car-userdebug
39. aosp_trout_arm64-userdebug
40. aosp_trout_x86-userdebug
41. aosp_whitefin-userdebug
42. aosp_x86-eng
43. aosp_x86_64-eng
44. arm_krait-eng
45. arm_v7_v8-eng
46. armv8-eng
47. armv8_cortex_a55-eng
48. armv8_kryo385-eng
49. beagle_x15-userdebug
50. beagle_x15_auto-userdebug
51. car_ui_portrait-userdebug
52. car_x86_64-userdebug
53. db845c-userdebug
54. gsi_car_arm64-userdebug
55. gsi_car_x86_64-userdebug
56. hikey-userdebug
57. hikey64_only-userdebug
58. hikey960-userdebug
59. hikey960_tv-userdebug
60. hikey_tv-userdebug
61. poplar-eng
62. poplar-user
63. poplar-userdebug
64. qemu_trusty_arm64-userdebug
65. rb5-userdebug
66. sdk_car_arm-userdebug
67. sdk_car_arm64-userdebug
68. sdk_car_portrait_x86_64-userdebug
69. sdk_car_x86-userdebug
70. sdk_car_x86_64-userdebug
71. sdk_pc_x86_64-userdebug
72. silvermont-eng
73. uml-userdebug
74. yukawa-userdebug
75. yukawa_sei510-userdebug

Which would you like? [aosp_arm-eng]
Pick from common choices above (e.g. 13) or specify your own (e.g. aosp_barbet-eng):

这里建议选择sdk开头的选项。

由于我们想要在x86_64的平台上使用emulator模拟运行,所以使用sdk_x86_64-userdebug选项。

1
2
3
4
5
6
7
8
9
10
11
12
13
14
15
16
17
18
19
20
21
22
23
24
$ lunch sdk_x86_64-userdebug

============================================
PLATFORM_VERSION_CODENAME=REL
PLATFORM_VERSION=13
TARGET_PRODUCT=sdk_x86_64
TARGET_BUILD_VARIANT=userdebug
TARGET_BUILD_TYPE=release
TARGET_ARCH=x86_64
TARGET_ARCH_VARIANT=x86_64
TARGET_2ND_ARCH=x86
TARGET_2ND_ARCH_VARIANT=x86_64
HOST_ARCH=x86_64
HOST_2ND_ARCH=x86
HOST_OS=linux
HOST_OS_EXTRA=Linux-5.4.0-150-generic-x86_64-Ubuntu-18.04.6-LTS
HOST_CROSS_OS=windows
HOST_CROSS_ARCH=x86
HOST_CROSS_2ND_ARCH=x86_64
HOST_BUILD_TYPE=release
BUILD_ID=TQ2A.230505.002.A1
OUT_DIR=out
PRODUCT_SOONG_NAMESPACES=device/generic/goldfish device/generic/goldfish-opengl hardware/google/camera hardware/google/camera/devices/EmulatedCamera device/generic/goldfish device/generic/goldfish-opengl
============================================

4.2 编译

接下来可以直接输入:

1
$ m

该命令可以自动识别机器CPU核心数,使用所有核心编译。

同样可以使用make指定核心数:

1
$ make -j4

5 运行Android系统

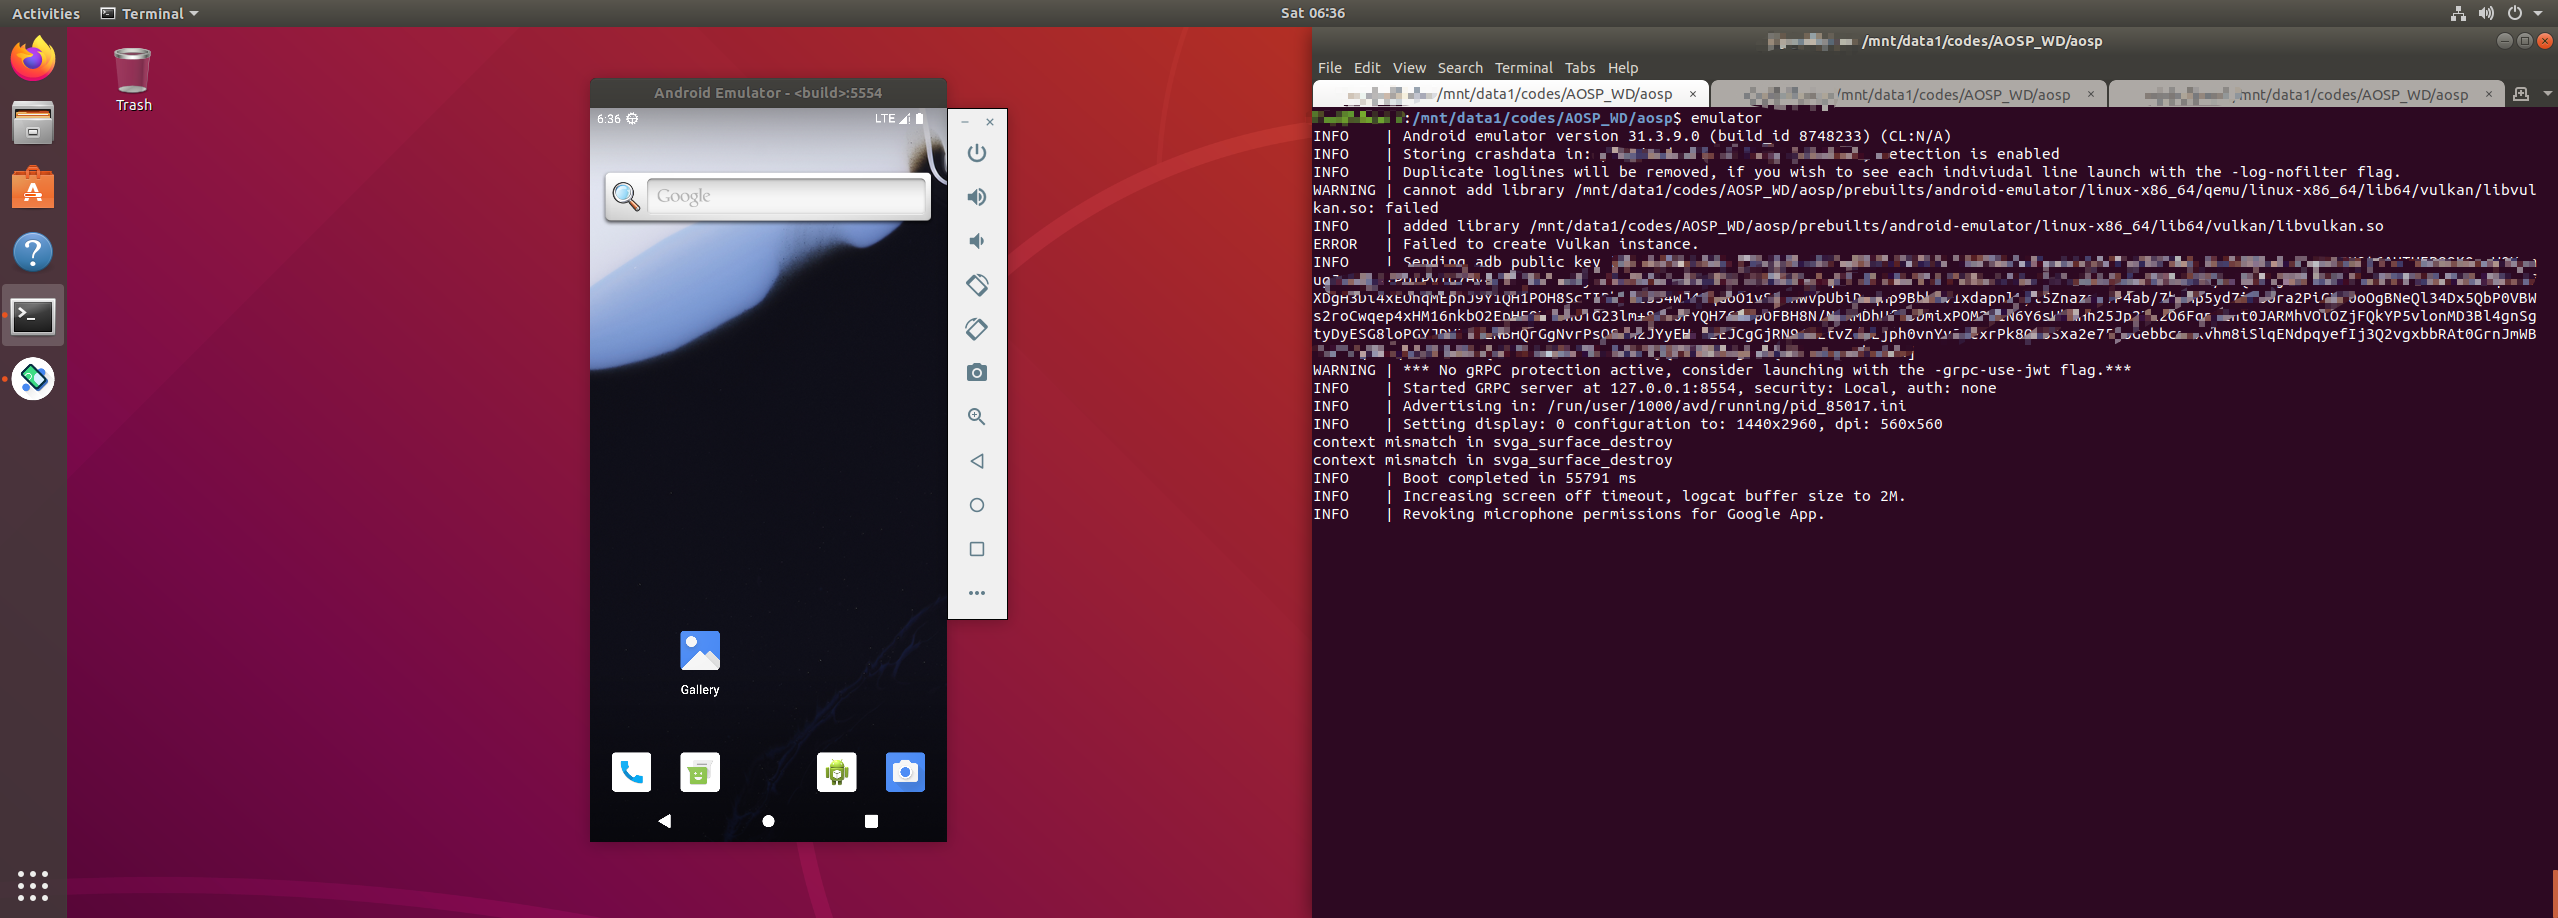
这里我们使用AOSP提供的emulator在虚拟机中运行Android系统,直接在aosp目录输入:

1
$ emulator

运行结果:

6 编译Android驱动

6.1 Android驱动——hello_module

Android本身是在Linux内核之上的系统,所以Android驱动也可以理解为Linux驱动。下面是一个Android驱动的代码:

1
2
3
4
5
6
7
8
9
10
11
12
13
14
15
16
17
18
// hello_module.c
#include <linux/module.h>
#include <linux/init.h>

static int __init hello_init(void)
{
printk("Hello world!\n");
return 0;
}

static void __exit hello_exit(void)
{
printk("hello exit\n");
}

module_init(hello_init);
module_exit(hello_exit);
MODULE_LICENSE("GPL");

6.2 下载Android-kernel源代码

在Android官方文档https://source.android.com/docs/setup/build/building-kernels?hl=zh-cn中介绍了构建内核的方法。也同样可以使用TUNA镜像进行加速:

1
2
$ repo init -u https://mirrors.tuna.tsinghua.edu.cn/git/AOSP/kernel/manifest -b BRANCH
$ repo syncs

这里的BRANCH可以在https://source.android.com/docs/setup/reference/bazel-support?hl=zh-cn选择合适的分支,比如我们这里选择了common-android13-5.15

6.3 将加入hello_module驱动内核

源代码Android-kernel中包含common-modules文件夹,由于存放供应商模块。我们在common-modules/virtual-device目录下创建hello_module文件夹,其中存放我们的驱动代码hello_module.c,以及下面的Kbuild文件:

1
2
3
4
5
6
# SPDX-License-Identifier: GPL-2.0

hello-module-objs := hello_module.o

obj-m += hello-module.o

hello_module文件夹的父目录(即common-modules/virtual-device)下的Kbuild中加入obj-m += hello_module/

1
2
3
4
5
obj-m += virtio_gpu/
obj-m += arcvm_drivers/dev-sw-sync/
obj-${BUILD_GOLDFISH_DRIVERS} += goldfish_drivers/
# 新加入:
obj-m += hello_module/

hello_module文件夹的父目录(即common-modules/virtual-device)下的BUILD.bazel_virt_common_ext_modules加入"hello_module/hello-module.ko",

1
2
3
4
5
6
7
8
9
10
11
12
13
# ...

_virt_common_ext_modules = [
"arcvm_drivers/dev-sw-sync/sw_sync.ko",
"goldfish_drivers/goldfish_address_space.ko",
"goldfish_drivers/goldfish_pipe.ko",
"goldfish_drivers/goldfish_sync.ko",
"virtio_gpu/virtio-gpu.ko",
# 新加入:
"hello_module/hello-module.ko",
]

# ...

6.4 编译

编译所有virtual-device(也包括hello-module.ko)

1
$ tools/bazel build //common-modules/virtual-device:virtual_device_x86_64_dist

可以使用dist_dir选项输出到指定文件夹:

1
$ tools/bazel run //common-modules/virtual-device:virtual_device_x86_6s4_dist -- --dist_dir=out/mydist

成功编译出:

1
2
$ find ./out/mydist/ -name hello-module.ko
./out/mydist/hello-module.ko

7 运行Android驱动程序

正常情况下,直接使用adb push将hello-module.ko放入android系统中,使用insmod安装驱动即可成功运行。但是新版Android系统为了安全性,加入了对驱动的检查。
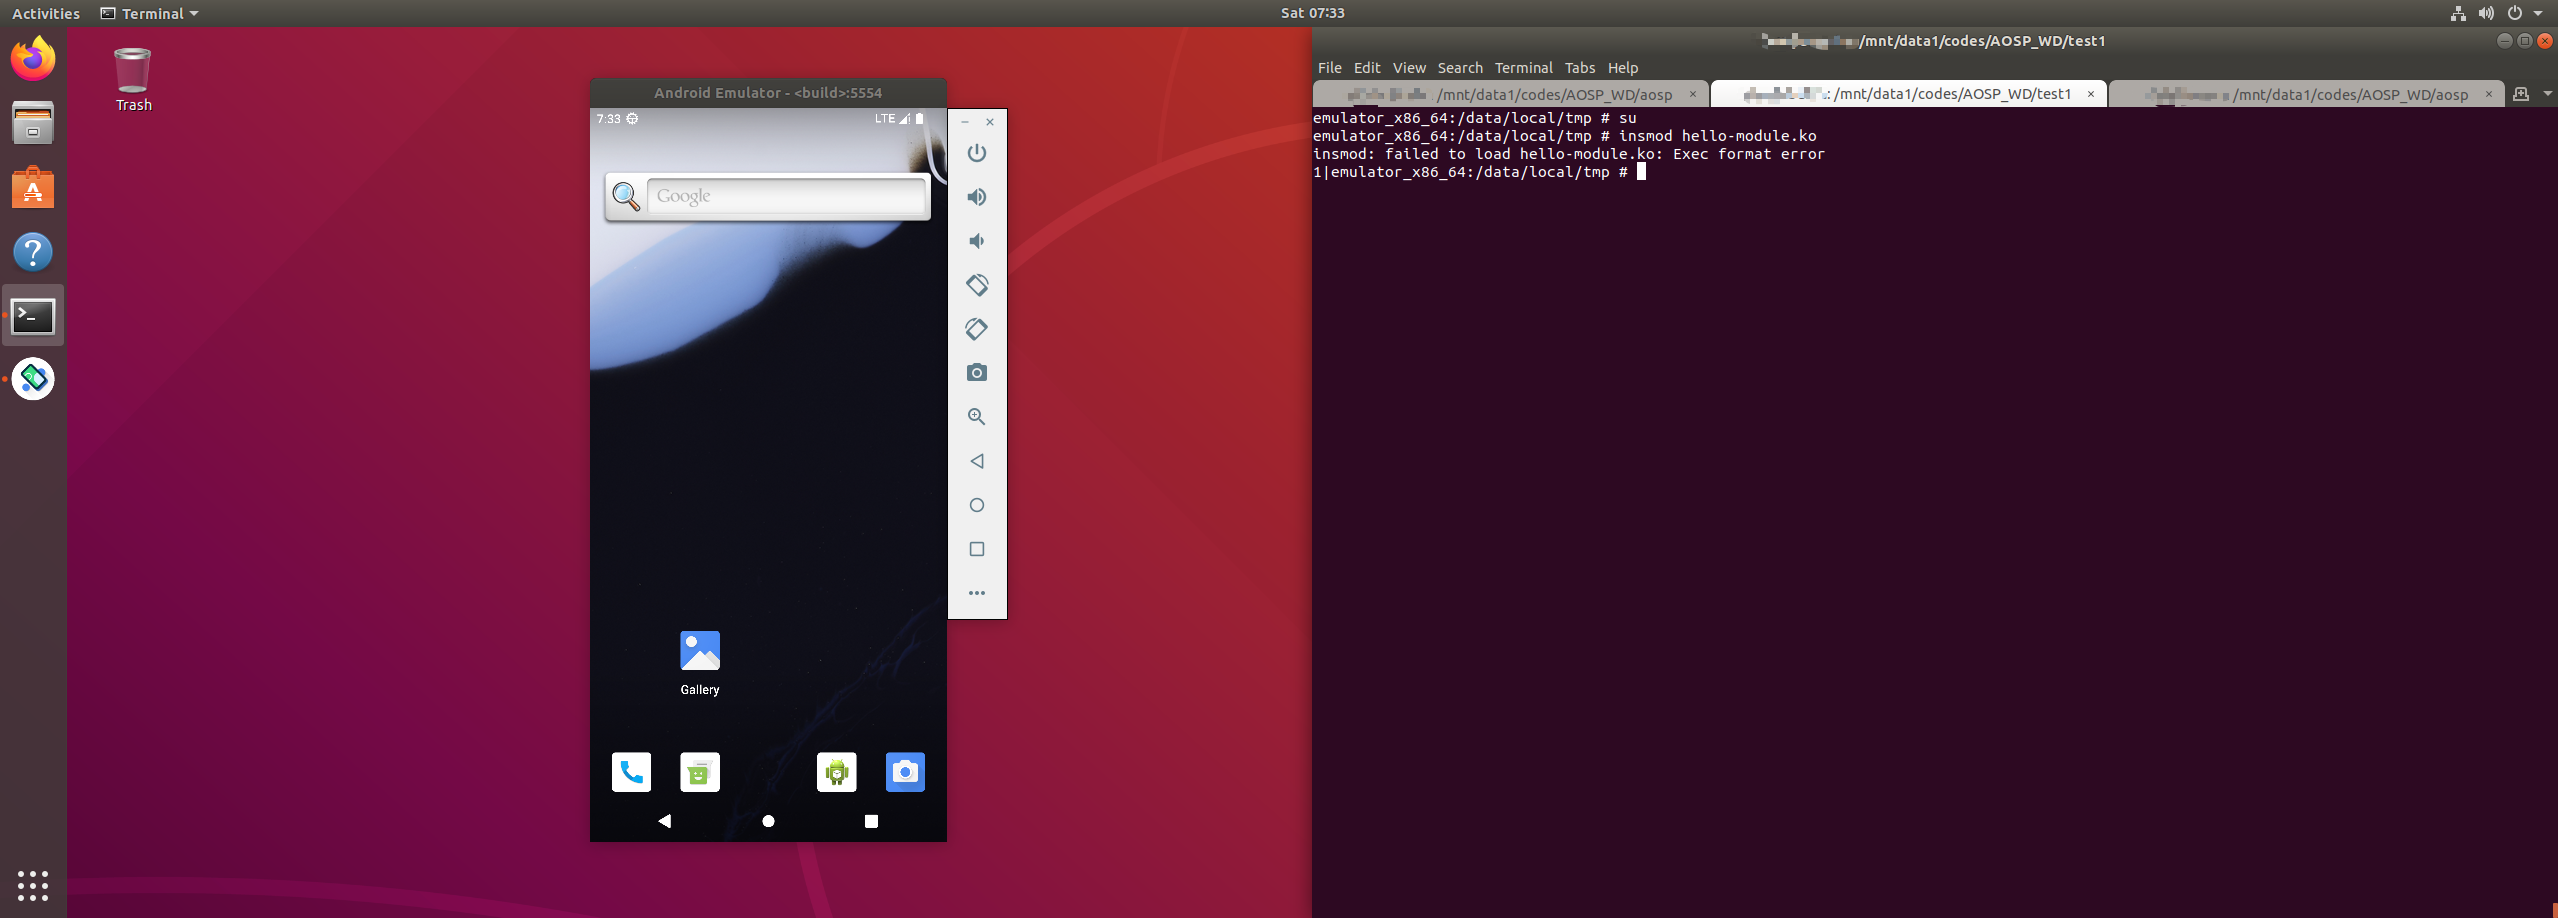
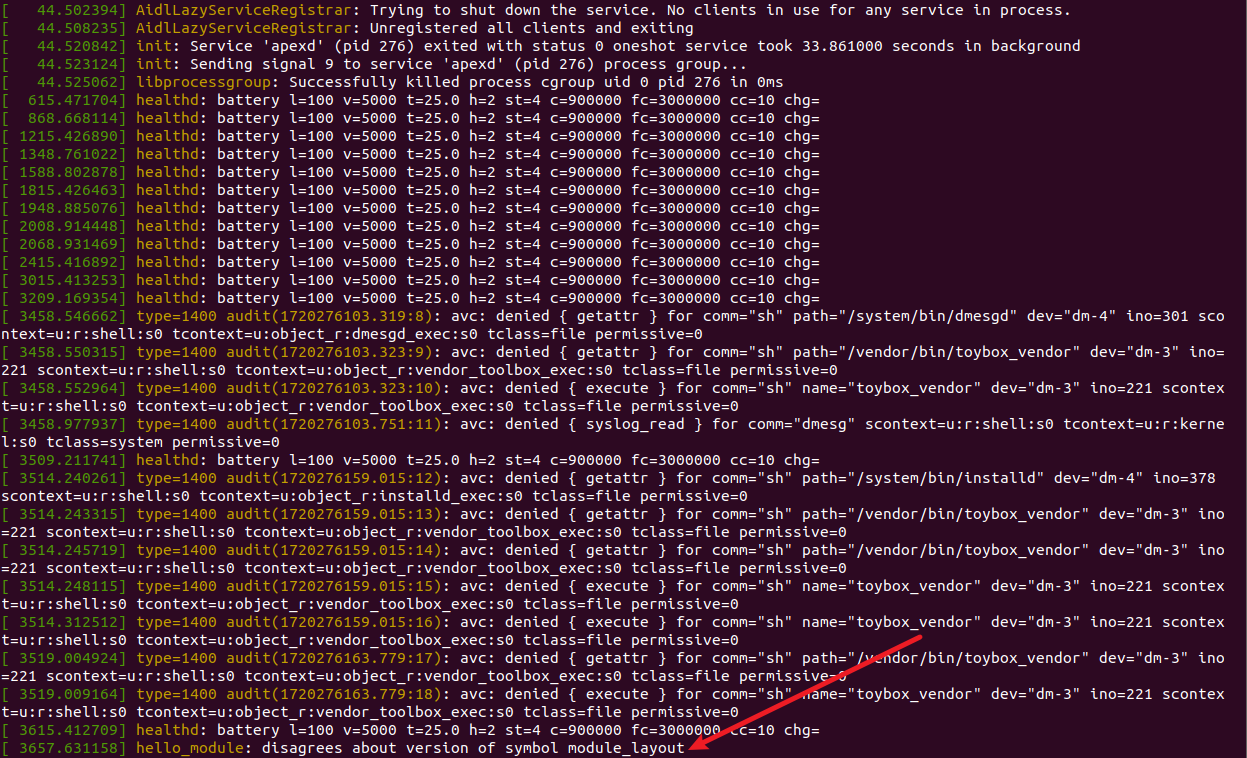
使用dmesg查看:
7.1 Patch驱动程序

根据报错:

1
[ 3657.631158] hello_module: disagrees about version of symbol module_layout

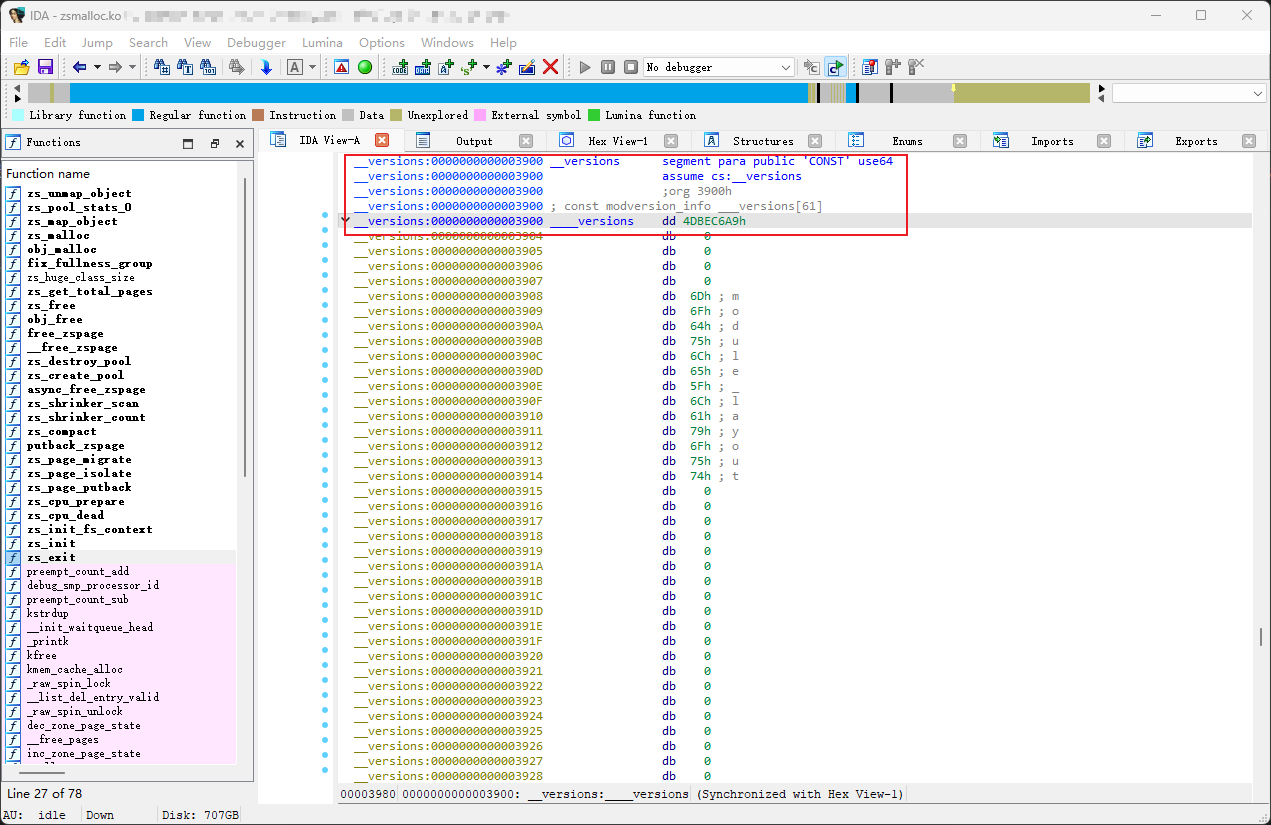
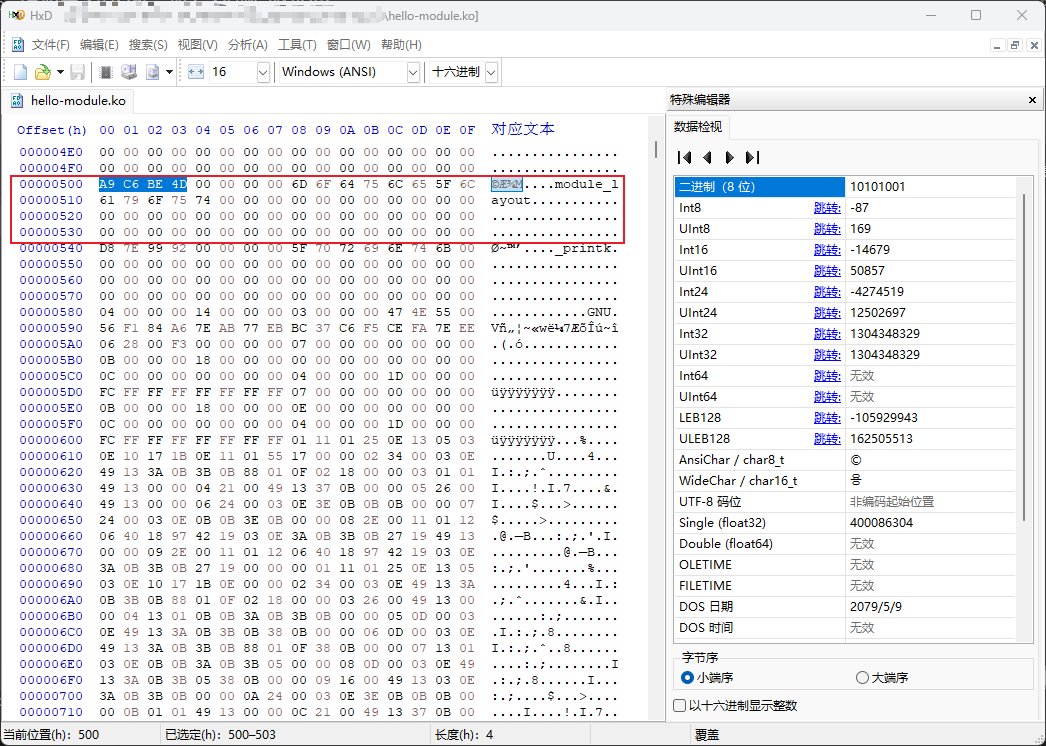
我们猜测应该是版本不匹配造成的,那么接下来寻找合法的驱动程序进行比对。这里我们选择aosp中kernel/prebuilts/common-modules/virtual-device/5.15/x86-64/文件夹下的文件,如zsmalloc.ko

我们将hello-module.ko对应的__versions中前四个字节改为相同的即可:
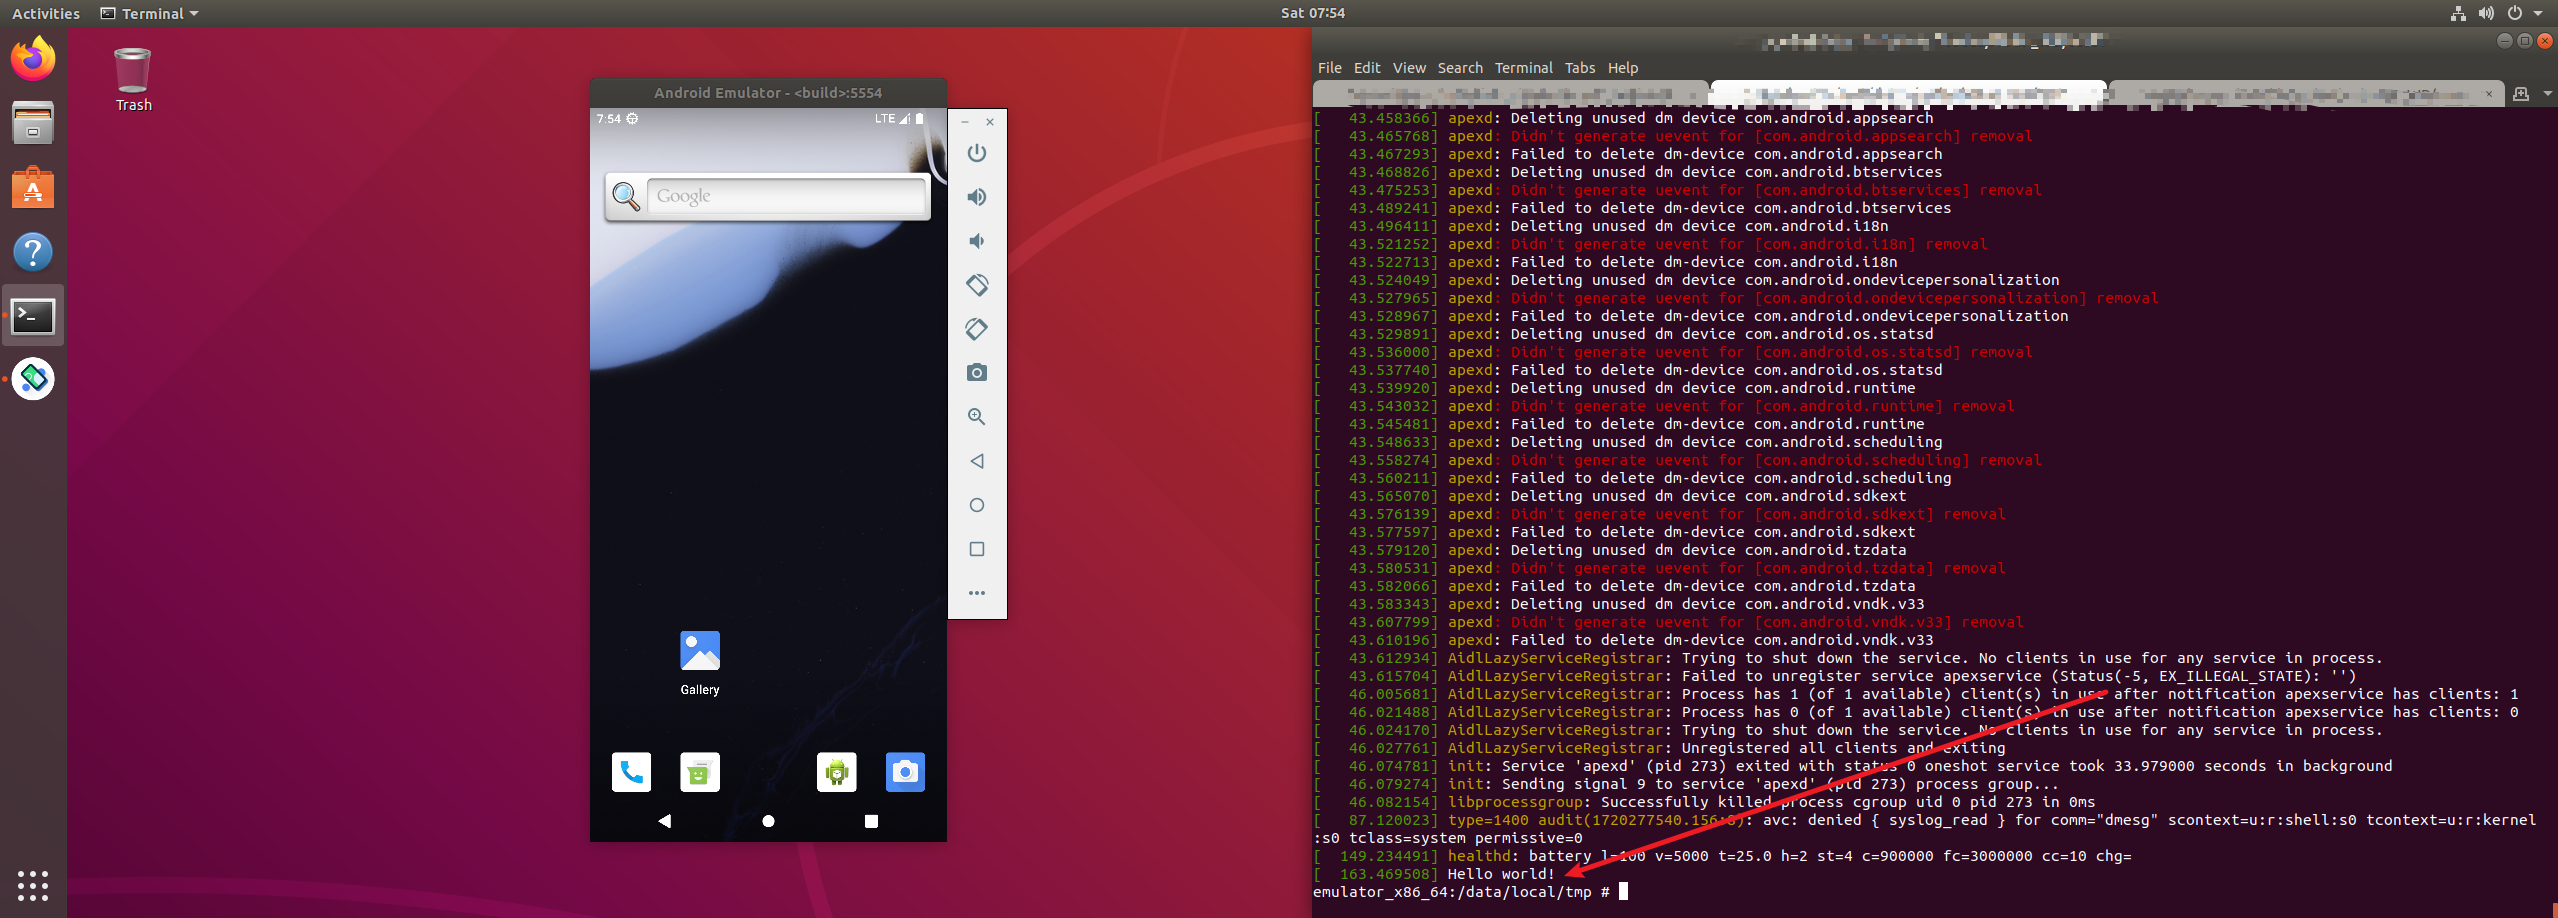
重复第7节最开始的步骤,可以看到成功以及安装并运行了驱动:
参考文献

[1] Android官方文档 https://source.android.com/
[2] Basic android kernel development https://github.com/itewqq/android-kernel-play
[3] TUNA Android 镜像使用帮助 https://mirrors.tuna.tsinghua.edu.cn/help/AOSP/
[4] Linux内核模块常见问题 https://wiki.zohead.com/%E6%8A%80%E6%9C%AF/Linux/kernel/Linux%E5%86%85%E6%A0%B8%E6%A8%A1%E5%9D%97%E5%B8%B8%E8%A7%81%E9%97%AE%E9%A2%98.md
[5] Android系统编写Linux内核驱动 https://github.com/liushui312/notes/blob/master/android/4_android%E7%B3%BB%E7%BB%9F%E7%BC%96%E5%86%99Linux%E5%86%85%E6%A0%B8%E9%A9%B1%E5%8A%A8.txt